
Audio Visual Control Systems Staff Actually Use
Make meetings frictionless with task-first AV control UX: intuitive conference room audio visual control systems, clear room states, two-way feedback, and standards that scale.
Why Control UX Matters in the Modern AV Room
The hidden cost of poor conference room audio visual experiences
Every minute spent wrestling with a confusing touchpanel or mismatched gear is a minute your team isn’t collaborating. Slow starts, inconsistent conference rooms, and opaque interfaces are the most common failure points we see in audio visual control systems – and they create a ripple effect: late agendas, lost confidence, and more help-desk tickets.
“Each technology issue adds an average 5-minute delay to meetings.” – Source
Control UX, in this context, means the end-to-end user experience of your audio visual controller: how users start meetings, choose sources, join calls, adjust audio, see status, recover from errors, and shut rooms down – across every AV room. Great control UX reduces cognitive load and guides users to the right action at the right time.
Common problems it solves:
- Slow starts: too many steps to present or join a call
- Confusing interfaces: device-centric pages, cryptic labels, buried controls
- Inconsistent rooms: every space behaves differently, increasing training needs
What great AV room control looks like
Great control experiences are opinionated and simple. They lead with the task, not the gear.
- One-tap start: users can begin Present or Video Call with a single press
- Clear room states: Idle, Present, Video Call – each state changes what’s visible and actionable
- Visible feedback everywhere:
- Mute state: mic mute is obvious on-screen and on-device
- Call state: connected, dialing, or ended is unmistakable
- Source selected: exactly which input is live, with friendly names (e.g., “Laptop HDMI”)
- Guardrails: confirmation for disruptive actions (end call, power off), and clear error recovery
- Accessibility and consistency: same icons, labels, and flows across every conference room audio visual setup
Outcomes that matter to the business
The right control UX translates directly into measurable operational wins:
- Fewer help-desk tickets: less hand-holding to start meetings or switch sources
- Faster time-to-start: presenters get from walk-in to content on screen in seconds
- Higher adoption: more consistent use of conference room audio solutions (and fewer “bring-your-own-workarounds”)
- Standards that scale: one interface pattern across locations makes every AV room feel familiar, reducing training and support overhead
What this guide covers
In the sections that follow, we’ll give you a practical playbook you can put to work immediately:
- Principles for intuitive touchpanels, presets, and room states for audio visual control systems
- Templates you can replicate for home screens, in-call views, and error states
- Metrics to track (time-to-start, call success rate, mute errors, ticket categories)
- A rollout playbook to standardize conference room audio visual experiences across sites and keep them consistent over time
Design the Home Screen First: Tasks, Not Devices
Start with jobs-to-be-done, not gear
A great AV home screen is a decision shortcut. Lead with the three tasks users perform 90% of the time:
- Present
- Join Video Call
- Audio Call
Everything else goes behind a single “More” button so your audio visual control systems stay clean and fast. This task-first approach removes guesswork and reduces time-to-start.

Room states that guide users
Design your audio visual controller around explicit room states. The UI should change based on intent, revealing only relevant controls.
- Idle
- Show room name, “AV Ready” status, network check, and next calendar event
- Quick-start tiles: Present, Video Call, Audio Call
- Present
- Clear source selection with friendly labels, master and program volume, and privacy indicators (e.g., mics muted by default)
- Video Call
- Platform-agnostic join (Teams, Zoom, Meet) with one-tap start
- Prominent camera toggle, mic mute, speaker volume, and participant feedback (connected/dialing)
- Audio-Only
- Big dialer, favorites/contacts, call timer, and high-visibility mute
Microcopy and iconography that reduce errors
Words and icons do the heavy lifting. Keep them plain, consistent, and predictable.
- Plain labels: “Share laptop” instead of “HDMI 1”
- Consistent verbs: Join, Share, End
- Standard icons: mic, camera, screen-share, call, end-call
- Confirmation for destructive actions: End Call, Power Off
Visibility of system status
Make room status impossible to miss so users trust the system at a glance.
- Top banner: room name, platform status, network check, and “AV Ready”
- Live indicators: mic mute state, camera on/off, occupancy detected
- Inline feedback: current source selected, active call status, volume level
“Reducing choices and prioritizing primary tasks lowers cognitive load and speeds decisions – core to usable interfaces.” – Source
Presets and Scenes That Match Real Meetings
Map presets to outcomes
Presets should reflect real meetings – not individual devices. Start with the outcomes teams expect and bundle everything the room must do to support that moment.
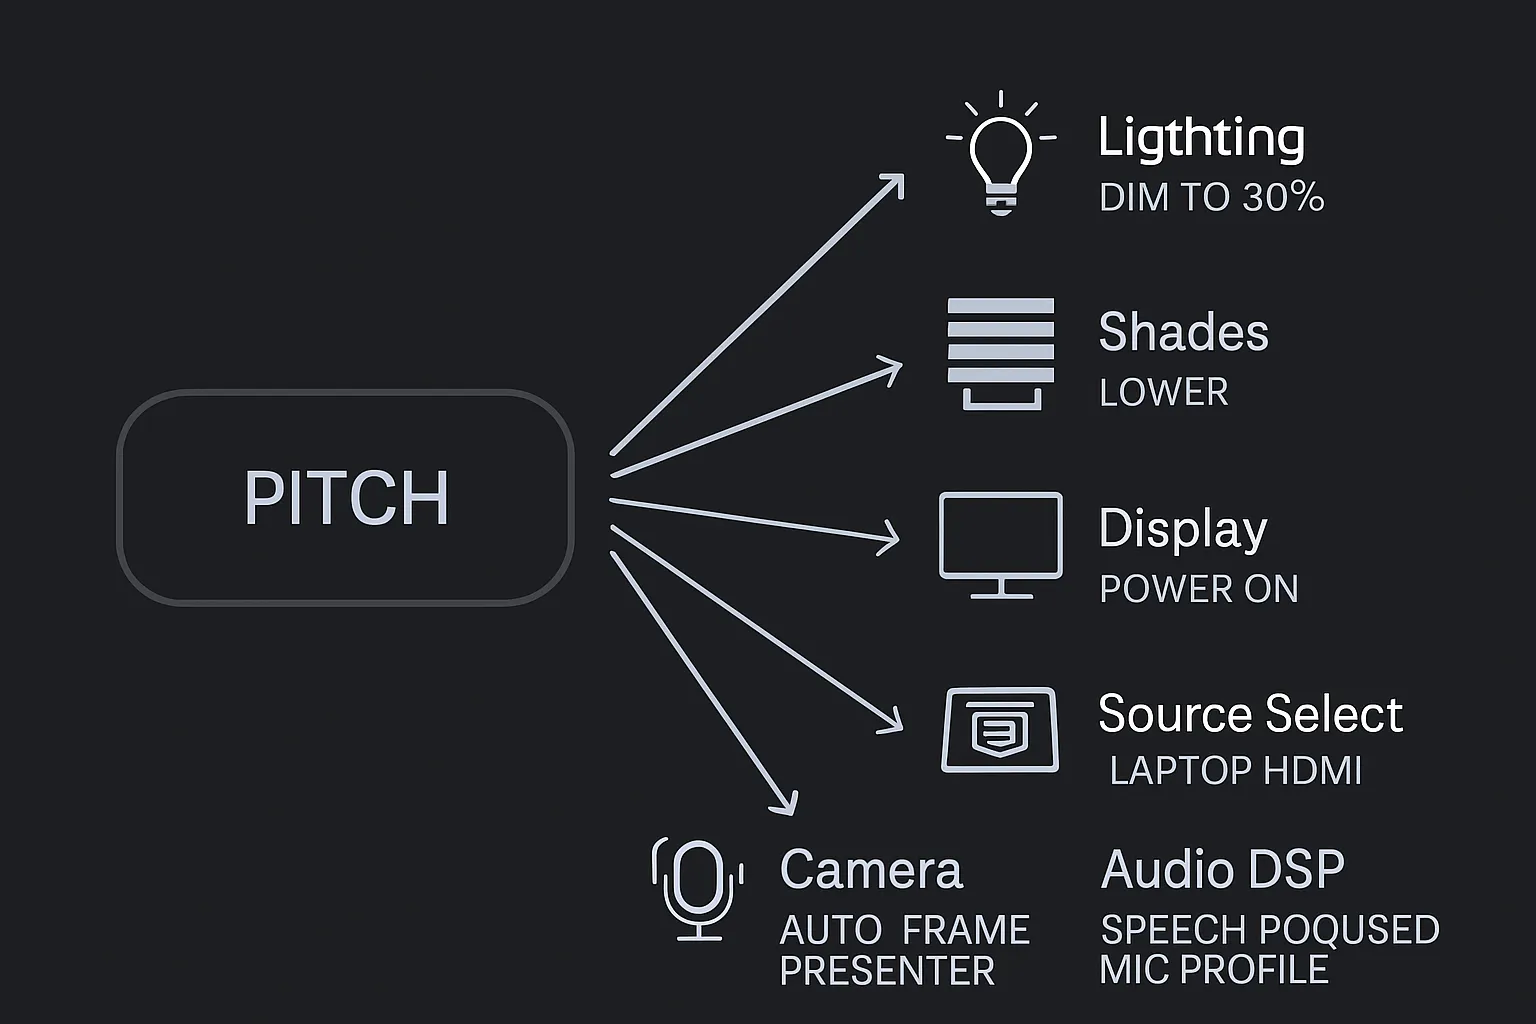
- Typical presets: Standup, Pitch, Training, Town Hall, Video Call
- Bundle actions across the stack: source selection, camera framing, mic zones and DSP profile, lighting levels, and shades
- Deliver one-tap confidence: the room transitions to the right state in seconds, reducing friction with your audio visual controller and lowering support demand
Camera presets that users understand
Camera controls should speak the language of the meeting.
- Name by outcome, not position: “Speaker close-up,” “Panel wide,” “Audience Q&A,” “Whiteboard”
- Show preview thumbnails when possible so users can see the framing before switching
- Provide safe defaults: start every Video Call with a “Panel wide” or “Room overview,” then guide users to refine with one-tap presets
Audio profiles by room mode
Your conference room audio solutions need context-aware profiles.
- Speech-focused profile: tighter gating, gentle noise reduction, and acoustic echo cancellation optimized for intelligibility
- Content playback profile: wider dynamic range and less aggressive gating to keep media sounding natural
- Automatic gain control (AGC): enable for speech-only modes; reduce or disable for content-heavy sessions to prevent pumping
- Visual feedback: on-screen mic state and per-zone activity so users trust what the room is hearing
Preventing “preset sprawl”
Keep your audio visual control systems fast and predictable by resisting the temptation to add endless variants.
- Governance: limit visible presets to 4–6 per room; hide advanced options behind “More”
- Change control: require a simple request-and-approval workflow for any new preset (what problem it solves, who uses it, when it’s needed)
- Sunset policy: remove or hide unused presets based on analytics (e.g., zero use over 60 days)
- Naming rules: outcome-first labels with consistent verbs and nouns across all AV rooms and locations
Sample preset library by room type
| Preset name | Triggers (lighting/shades/audio/video/camera) | Primary use case | One-tap outcome description |
|---|---|---|---|
| Huddle – Quick Present | Lights 60% warm; shades lower 25%; audio program 30% (mics muted); display on; source = Wireless | Ad‑hoc sharing | Screen powers on, room says “AV Ready,” share instruction shown; mics stay muted for privacy |
| Huddle – Video Call | Lights 80% front fill; shades auto-glare; speech profile; VC device on; camera auto-frame 2–4 people | Spontaneous call | Call platform wakes, tiles show Join options; camera framed, mics unmuted with noise reduction |
| Huddle – Whiteboard | Lights 100% front; shades up; speech profile; whiteboard camera on | Hybrid whiteboarding | Whiteboard camera preview live; remote participants see board clearly |
| Small – Standup | Lights 85% balanced; shades neutral; speech profile; display on; camera presenter track | Daily team sync | Ready to present or call; auto-tracks primary speaker |
| Small – Pitch | Lights 70% front / 40% back; shades down; speech profile; display on; source = Laptop HDMI; camera speaker close-up | Client presentation | Content routes to display; camera frames presenter; mics optimized for speech |
| Small – Video Call | Lights 75%; shades auto; speech profile; VC on; camera room overview | External meeting | One-tap join; room overview to start, with quick access to “Speaker close-up” |
| Medium – Training | Lights 65% even; shades down; speech profile; dual displays on; camera instructor + audience wide | Instructor-led training | Content on display A; roster/notes on display B; clear voice pickup across room |
| Medium – Town Hall | Stage lights 80%; shades down; reinforcement off; recording on; camera stage wide + audience | All-hands | AV routes for broadcast/recording; Q&A mic lanes enabled |
| Large – Panel Discussion | Stage lights preset; shades down; speech profile (panel/table mics); multi-cam preset | Panel session | Panel wide preset active; quick one-taps for “Panel close,” “Audience Q&A” |
| Large – Video Call | Lights broadcast-safe; shades down; echo control; VC on; auto camera switching by mic activity | Hybrid all-hands | Join options visible; cameras follow active speakers; far-end mix optimized |
| Training – Hands-on Lab | Task lights up; shades neutral; content profile; doc cam on; display split-view | Demos and walkthroughs | Doc camera on left; slides on right; audio tuned for media clarity |
| Training – Webinar Host | Key lights 70%; shades down; speech profile; VC/webinar app on; camera host close-up | Remote delivery | Camera tight on host; mics optimized; “On Air” indicator and record |
By mapping presets to real outcomes and enforcing governance, your conference room audio visual experience becomes simpler, faster, and more consistent – at scale across locations.
Two-Way Feedback Beats “Spray-and-Pray”
Why feedback matters
One-way “send and hope” control leads to confusion and privacy mistakes. Two-way feedback in audio visual control systems confirms the true live state of the AV room so users know exactly what’s happening.
- Reflect true device state: mic mute, camera on/off, call connected/ended, display power, source actually routed
- Prevent privacy errors: show unmistakable mic/camera indicators on the touchpanel and at the device so no one speaks on-mic by accident
- Build trust: every action produces immediate, visible confirmation or a clear error with next steps
“IT departments receive an average of 11 tickets per week for meeting room technology issues.” – Source
State synchronization across devices
Your audio visual controller must stay in sync even when users press hardware buttons, grab a third‑party remote, or join a call from a laptop.
- Listen for external changes: subscribe to device events (DSP mute state, camera tally, display power, switcher route) and update the UI instantly
- Honor hardware inputs: if someone mutes from a boundary mic or camera remote, reflect the change on the touchpanel and room LEDs
- Show progress, not mystery:
- “Connecting to Video Call…” with spinner and step indicators (network → platform auth → media connected)
- Graceful retries with backoff; expose “Retry Now” and “Change Network” when appropriate
- Clear error handling:
- “Display not responding. Attempting recovery (1/3)…”
- Offer alternatives: “Use secondary display” or “Switch to Wireless Present”
Reliability patterns
Design your conference room audio visual experience to be resilient by default.
- Idempotent actions
- Prefer explicit Set commands (Set Mic Mute = On) over toggles to avoid drift
- Use room “scenes” that drive devices to a known state regardless of prior conditions
- Timeouts and circuit breakers
- Per-device timeouts (e.g., 3–5 seconds) with user feedback; stop cascading failures
- Fall back to a minimal “Present” state if UC platform fails to join
- Safe fallbacks and recovery states
- One-tap “Recover Room” macro: power-cycle displays (CEC or IP), re-route source, re-check network
- Auto-rollback to Idle if call setup fails after N retries
- Visual confirmations and cues
- High-contrast on-screen badges: “Mic Muted,” “Camera Off,” “In Call”
- LED bar or mic-ring color tied to system state; soft audio chime for mute/unmute and call connect/disconnect
- Toast messages for critical transitions: “Source switched to Laptop,” “Shades lowered,” “Speech profile enabled”
Two-way feedback makes conference room audio solutions faster, safer, and dramatically easier to support – eliminating “spray-and-pray” guesswork and the tickets that come with it.
Standardize the Experience Across Rooms
Template the conference room audio visual controller UI
Standardization removes surprises and slashes training time. Build a single UI template and deploy it across platforms and locations.
- Consistent home layout, button order, and labels in every AV room
- Cross-platform parity: mirror the same flows on Crestron, Extron, Q‑SYS, and web touch controllers
- Lock the hierarchy: Home → Room States (Idle/Present/Video Call/Audio) → Controls → More

Naming conventions and visual grammar
Make names and visuals universally understandable to reduce cognitive load.
- Input names users understand: “Front wall PC,” “Table HDMI,” “Wireless Share,” “Codec PC”
- Icon library: consistent mic, camera, share, call, end-call, volume, settings
- Color system: reserved colors for state – green (AV Ready), red (mute/end), amber (warning), blue (active selection)
- Contrast and size: WCAG-friendly contrast; minimum touch target 9–10 mm; 16–24 px label text in high-traffic rooms
Documentation that scales
Treat your UI like a product with versioned standards.
- Style guide: typography, color, spacing scales, icon set, and interaction rules
- Component library: reusable home tiles, status bars, source selectors, volume bars, camera presets, alerts
- Configuration checklist: per-room validation of sources, labels, camera presets, and audio profiles
- Versioning and change log: enterprise control templates with semantic version numbers; record what changed and why
Control template checklist
| Component | Standard (label, icon, size/spacing) | Rationale (usability/consistency) | QA criteria |
|---|---|---|---|
| Home tiles | Labels: Present/Video Call/Audio Call; icons: share/camera/phone; 140–160 px tiles with 16–24 px labels; 16 px gutters | Immediate recognition and fast entry to top tasks | All tiles visible above the fold; press target ≥9 mm; labels pass contrast |
| Status bar | Left: Room name; Center: “AV Ready” with network check; Right: time/next meeting | Trust and orientation at a glance | State updates within 1s of device change; next event shows correct time |
| Source select | Friendly names; selected source highlighted; list max 5 with “More” overflow | Prevents misroutes and choice overload | Selected source matches actual route; switch within 2s; overflow works |
| Camera presets | Outcome names (Speaker close-up, Panel wide); optional thumbnails; 3–5 visible | Faster, safer framing | Preset recalls within 1s; thumbnail matches live; no abrupt jumps |
| Volume/Mute | Master volume bar + mute toggle; clear mic mute badge | Prevents privacy mistakes | Mute state synced bi-directionally; visual change within 500 ms |
| More menu | Secondary actions (lights, shades, admin); grouped logically | Keeps home uncluttered | No critical task buried; items follow naming rules; back navigation clear |
A consistent, templated conference room audio visual experience reduces training, speeds adoption, and makes support measurable – no matter how many rooms or platforms you deploy.
Inclusive by Design: Accessibility and Language
Accessibility fundamentals for conference room audio solutions
Designing for inclusion increases usability for everyone and ensures your rooms meet policy and legal standards.
- Touch targets: minimum 44×44 px for all primary actions; maintain ≥9–10 mm physical touch zones on hardware panels
- Reach zones for wall panels: mount operable controls within accessible forward/side reach ranges to support wheelchair users
- High contrast: use a color palette that meets minimum text contrast and icon legibility in bright rooms
“WCAG recommends at least 44×44 CSS pixels for touch targets (SC 2.5.5), and a minimum 4.5:1 contrast ratio for body text (SC 1.4.3). ADA reach ranges place operable parts 15–48 inches above the floor.” – Source
Language and localization
Language clarity and localization options make your audio visual control systems approachable for diverse teams.
- Plain English labels by default; avoid jargon like “HDMI 1” – use “Share laptop”
- Easy language toggle at the home screen or profile level for multilingual sites
- Microcopy that helps: confirmations (“End call?”), guidance (“Share laptop via HDMI or Wireless”), and error recovery (“Display not responding – Retry or Use Secondary Display”)
Multimodal feedback
Support different sensory needs and environments with redundant signals.
- Visual + audio cues: on-screen badges for mic/camera state, paired with gentle chimes for join/leave and mute/unmute
- Haptics where available: subtle vibration on critical actions (End call, Mute) to reduce ambiguity in noisy rooms
- Alternative control paths: enable personal device control via secure QR so users with mobility aids or seated positions can operate the room without reaching the panel
Hardware That Lasts: Panels, Power, and Mounting
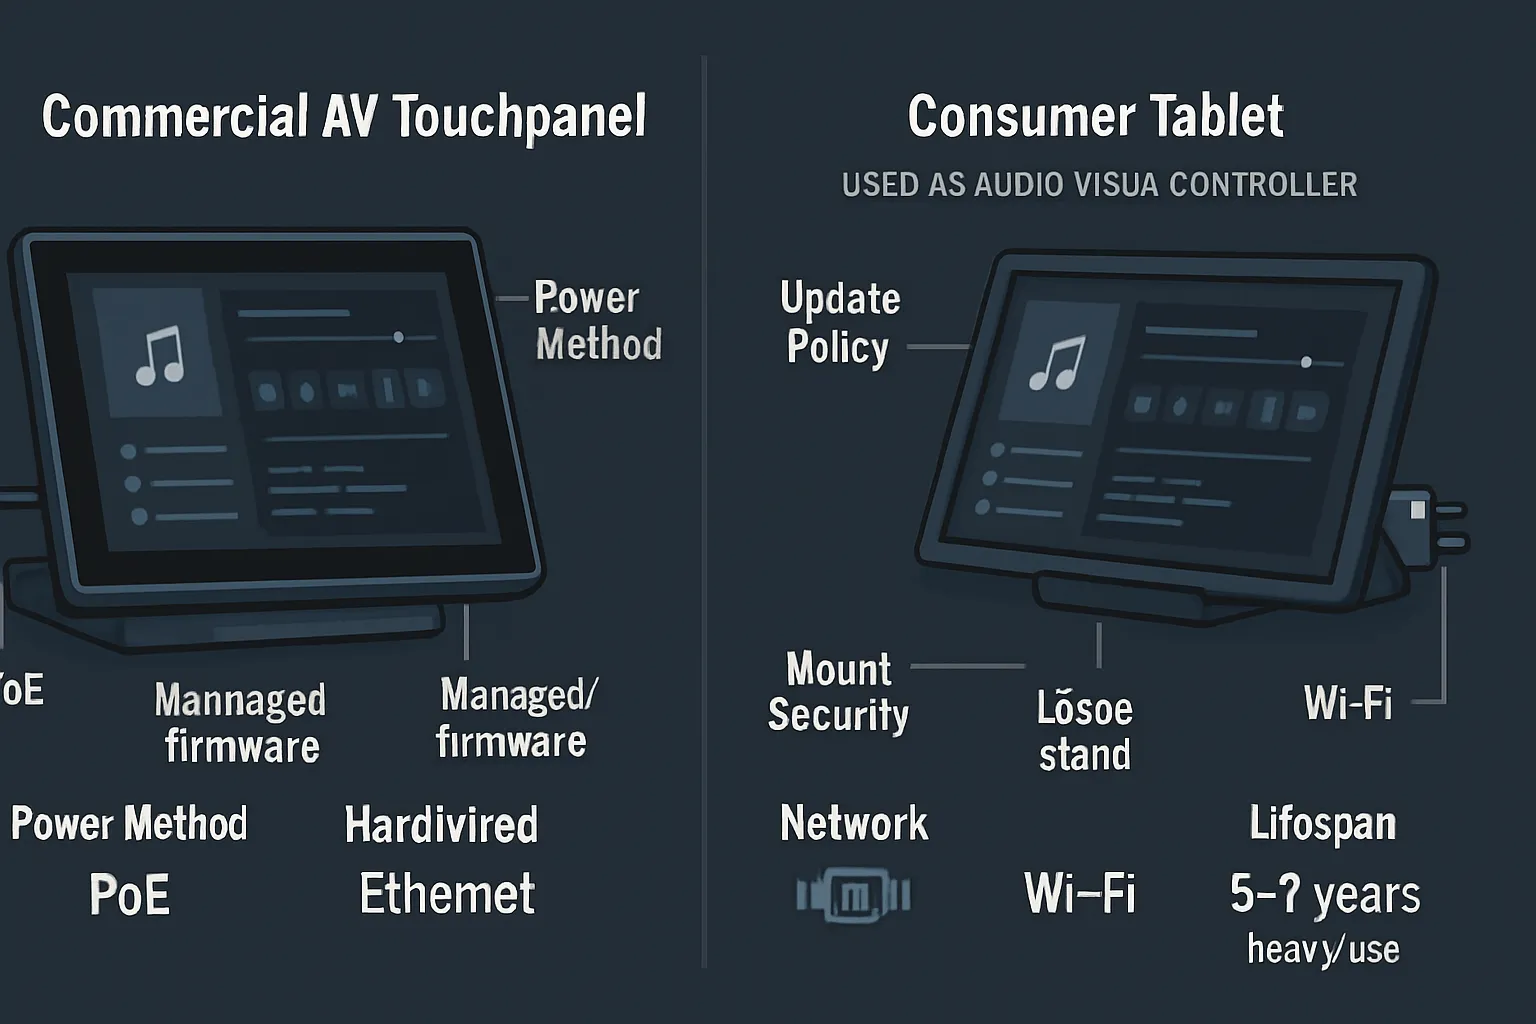
Dedicated panel vs. consumer tablet
Choosing the right control surface impacts reliability, security, and total cost of ownership for your audio visual control systems.
- Dedicated commercial touchpanel
- Pros: managed firmware and updates, 24/7 operation, PoE power, hardwired Ethernet, secure locking mounts, native accessories, longer lifecycle
- Cons: higher upfront cost, vendor ecosystem
- Consumer tablet
- Pros: low initial cost, flexible apps
- Cons: unmanaged OS auto-updates, batteries degrade on constant charge, consumer chargers/cables, Wi‑Fi dropouts, theft risk, limited mounting options, shorter lifecycle
Total cost of ownership (3–5 years):
- Dedicated panels typically win on uptime, supportability, and replacement cadence – especially across many conference room audio visual deployments.
- If you must use tablets, specify smart charging, MDM control, pinned-kiosk mode, and a secure PoE-to-USB power path to extend life and reduce surprises.
Power and network that reduce failures
Design for reliability in power and transport – the most common failure points.
- Prefer PoE/PoE+ for panels to eliminate wall warts and keep power monitored by IT
- Use hardwired Ethernet where possible; if Wi‑Fi is required, segment and prioritize AV traffic with QoS
- Battery health: avoid 24/7 charge on consumer tablets; use smart charging or scheduled charge windows
- Cable management: route through grommets and raceways; apply strain relief and label both ends
- Network readiness: reserve static DHCP or reservations for controllers; monitor with SNMP and set thresholds for latency/jitter
Ergonomics and environment
Meet users where they are and protect the hardware from the space itself.
- Mounting heights: wall panels placed within common reach ranges and away from door swings; angle tabletop panels to reduce glare
- Glare control: specify matte screens or hoods near windows; align lighting to avoid washout on displays and touchpanels
- Ingress protection: choose enclosures with appropriate IP ratings for kitchens, manufacturing floors, or high-dust environments
- Serviceability: allow clearance for cable swaps and provide a hidden service USB/Ethernet port for rapid field diagnostics
The right combination of purpose-built panels, solid power/network design, and ergonomic mounting will keep your conference room audio visual controller dependable for years – minimizing downtime and support costs.
Instrument, Measure, Improve
Metrics to track for control UX
If you don’t measure it, you can’t improve it. Build lightweight analytics into your audio visual controller to uncover friction and confirm wins.
- Time-to-start: seconds from panel touch to content on screen (Present) or media connected (Video Call)
- Touches-to-share: number of taps to route a laptop or wireless share to the display
- Touches-to-join: taps to start or join a meeting from the AV room
- Abandon rate: sessions that start an action (e.g., Join) but are canceled or time out
- Most-used presets: rank by room type to validate your library and prune the rest
- Error frequency by action: join failures, source route failures, display no-response, mic/camera sync errors
- Recovery success rate: percentage of incidents resolved by built-in “Recover Room” or “Retry” flows
Target baselines to aim for:
- Time-to-start: ≤20–30s for Video Call; ≤10s for Present
- Touches-to-share: ≤2 taps from home screen
- Touches-to-join: ≤2 taps from home screen, regardless of platform
Privacy-conscious analytics
Instrument for behavior, not identity. Your conference room audio visual telemetry should be useful and safe.
- Aggregate event logging only: avoid user names and email addresses in control logs
- Session-level IDs: rotate per session; never store PII
- Redact meeting details: log “Join: third-party platform” and outcome codes, not full URLs or passcodes
- Data minimization: capture timestamps, room ID, action, result, and duration – nothing more
- Retention policy: keep detailed logs short-term (e.g., 30–90 days), roll up trends for long-term benchmarking
Iterate with evidence
Ship small changes, validate, and scale what works across audio visual control systems globally.
- A/B test home tiles: placement, labels, and iconography (e.g., “Share laptop” vs. “Present”) in a controlled AV room cluster
- Pilot presets: introduce new scenes (e.g., “Panel Q&A”) to one location; compare usage and error rates to control sites
- Tune error flows: test “Retry → Fallback Display” versus “Recover Room” and select the path with higher success and lower abandon
- Rollouts with versioning: promote successful patterns to enterprise templates; tag with semantic versions and changelogs
- Close the loop: review monthly dashboards for time-to-start, touches, and ticket correlations; retire low-value actions and rename confusing labels
Continuous, privacy-safe measurement turns your conference room audio solutions into a self-improving system – reducing time-to-start, cutting help-desk tickets, and delivering a consistent, trusted experience in every AV room.
Implementation Roadmap and Change Management
Pilot to production
A disciplined path from concept to scale reduces risk and accelerates adoption across every AV room.
- Discover and align
- Stakeholder interviews: IT/AV, Facilities, end users, executive sponsors
- Baseline metrics: time‑to‑start, touches‑to‑join, top ticket categories, abandon rate
- Success criteria: define pass/fail thresholds for pilot (e.g., ≤2 taps to present; ≤30s to join)
- Prototype and test
- Clickable prototype of the audio visual controller home flow (Idle → Present/Video Call/Audio)
- Task‑based usability tests with 6–10 users; capture errors, hesitations, and time‑on‑task
- Refine microcopy, iconography, and presets based on evidence
- Hardening the build
- Configure monitoring/telemetry, recovery macros, and two‑way feedback for devices
- Validate device driver compatibility and QoS on the production network
- Staged rollout (contain risk and learn fast)
- Phase 1: Huddle rooms (lowest complexity) – validate standards and telemetry
- Phase 2: Medium rooms – add camera presets, expanded audio profiles, multi‑display logic
- Phase 3: Large/Town Hall/Training – add multi‑camera, recording/streaming, lighting/shades integration
- Gate reviews and go/no‑go
- Each phase exits with acceptance tests: time‑to‑start, join success rate, ticket reduction vs. baseline
- Document issues, apply fixes, version the enterprise template, and proceed
Recommended roles
- Executive sponsor (alignment, funding), AV/IT owner (technical authority), Facilities (power/mounting), Local champions (training, feedback), Integration partner (delivery and QA).
Training that sticks
Make training available in the flow of work and consumable in under two minutes.
- Microvideos (60–90 seconds)
- Topics: Present, Join Video Call, End Meeting, Recover Room
- Delivery: QR codes on the panel bezel and room signage link to a lightweight help microsite
- Quick‑reference cards (laminated, at the table)
- Task‑first flow: Present → Join → End; common pitfalls and recovery steps
- Visuals: home screen callouts for mic/camera indicators, source selection, and “More”
- Champions network
- Identify 1–2 super‑users per floor; short enablement session; offer direct escalation path
- Just‑in‑time guidance
- On‑panel tips the first 2–3 uses post‑upgrade; auto‑hide after the user completes tasks successfully
Support playbook
Codify operations so support is fast, predictable, and measurable.
- Remote assistance flow
- Tier 0: On‑panel “Recover Room” and “Retry” macros with clear progress/status
- Tier 1: Service desk uses remote control of the audio visual control systems (web URL/VPN)
- Tier 2: AV specialist engagement (device logs, firmware checks, network QoS verification)
- Tier 3: Integrator/vendor escalation with SLAs
- Escalation matrix
- Define severity levels (Sev‑1: executive/boardroom outage; Sev‑2: multi‑room issue; Sev‑3: single room)
- Response/restore targets (e.g., Sev‑1 response ≤5 min, restore ≤30 min with workaround)
- Spare‑kit strategy
- Per site: touchpanel, PoE injector/switch port, cables (HDMI/USB‑C/PoE), boundary mic, camera, small form‑factor switch, labeled adapters
- Document hot‑swap steps and rollback to Idle/Present state
- Governance for presets and templates
- Request process: who submits, business case (user, scenario, frequency), proposed label, target rooms
- Review cadence: monthly committee (IT/AV + champions) evaluates analytics (usage, error rate)
- Standards control: enterprise template versioning, change log, pilot in one cluster before global push
- Decommission rule: presets with zero/low usage over 60–90 days are removed or hidden
- Operational hygiene
- Firmware windows and blackout periods; rollback plan for each update
- Monitoring: alerting on panel offline, device no‑response, route failures, rising join errors
- KPIs: time‑to‑start, touches‑to‑join, join success rate, MTTR, ticket volume by category, user satisfaction pulse
Communication plan
- Pre‑rollout teaser and what’s changing, day‑1 quick start email with links/QRs, week‑2 feedback survey
- Site lead briefings for local champions; signage at the panel for the first month post‑launch
With a pilot‑first approach, concise training, and a clear support playbook, you’ll standardize conference room audio visual experiences, reduce downtime, and scale improvements confidently across your global AV rooms.
Conclusion: Make Meetings Frictionless
Key takeaways
- Lead with task-first design and clear room states
- Use two-way feedback, standard templates, and inclusive patterns
- Measure what matters and iterate across all conference room audio visual spaces
Next steps
- Audit your current audio visual control systems against this checklist
- Prototype a new home screen and pilot in one AV room
- Standardize and scale with governance and analytics
When you simplify the audio visual controller, standardize the UI, and verify true device state with two-way feedback, meetings start faster, calls connect reliably, and teams actually use the technology you’ve invested in. Whether you’re refreshing a single space or harmonizing hundreds of rooms, we’ll help you design and scale conference room audio solutions that feel intuitive in every AV room – every time.

